
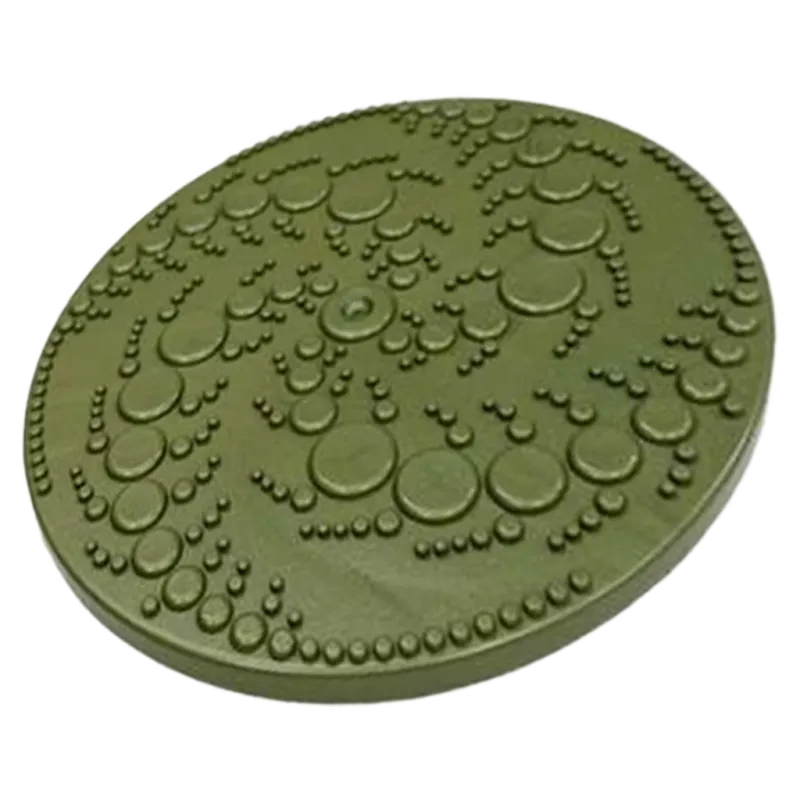

PreTreatment Disks - Aeration (2 Pack)
$399.99
$899.9956% offQuantity


The EBD PreTreatment Disks are designed to optimize the performance of septic systems, holding tanks, portable toilets, and RV sanitation units. By leveraging advanced Environmental Balance Device (EBD) technology, these disks facilitate a more efficient and sustainable wastewater treatment process.
Make sure you have the right product:
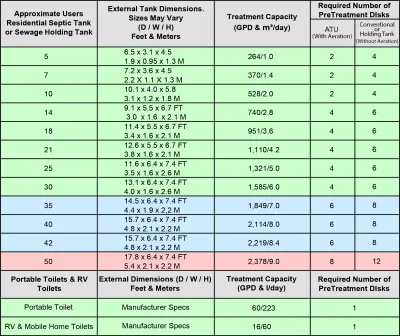
ATUs = 2 Disks - Aeration and oxygen helps out
Conventional Tanks = 4 Disks - No aeration and less oxygen
Key Benefits:
Accelerated Sludge Decomposition: Enhances the breakdown of organic matter, reducing sludge volume and minimizing the frequency of septic tank servicing.
Nutrient and Pathogen Reduction: Effectively lowers concentrations of nitrogen, coliform bacteria, and other pathogens, contributing to improved environmental health and compliance with regulatory standards.
Greenhouse Gas Mitigation: Assists in the reduction of greenhouse gas emissions, including ammonia, supporting broader environmental sustainability goals.
Energy and Maintenance Efficiency: Operates without the need for electricity, chemicals, or consumables, offering a low-maintenance solution with a service life exceeding 15 years.
Versatile Application: Suitable for various wastewater treatment scenarios, including systems exposed to brackish or seawater conditions.
Installation Guidelines:
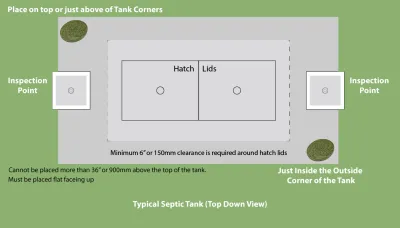
For optimal performance, install the EBD PreTreatment Disks horizontally, either on top or above the 4 corners of the septic or holding tank, as per the provided installation diagram. Ensure secure placement to prevent displacement during routine maintenance activities.
Option 1: The Tank Is Exposed — Lucky You!
If you have access to the top of your septic tank (or holding tank), congrats — you’ve unlocked Easy Mode.
Step-by-Step:
Grab your disks — you need 4 disks for conventional tanks. Only 2 disks for ATUs.
Locate the corners on top of your tank (see the diagram in images).
Stick one disk flat on or just above each corner of the tank — Sit it flat and well: Use industrial glue or even better: pop the disk into a waterproof box and set it down flat on the corner of the tank. Important! Disks must lie flat. They can be face up or down, but have to be flat. So make sure it can stay secured in a flat position before reburying or covering it back up.
Option 2: The Tank is Buried — A little digging required
No tank access? No problem. You’ve still got options. It just involves a little precision landscaping.
Step-by-Step:
Grab your disks — you need 4 disks for conventional tanks. Only 2 disks for ATUs.
Locate the corners on top of your tank (see the diagram in the images).
Method A: Pinpoint & Bury
Bury each disk 16 inches (40 cm) deep directly above each tank corner, where the disks would normally sit.
Stick one disk flat just above each corner of the tank — It can sit FLAT, right in the dirt. Even better: pop the disk into a waterproof box and set it down flat above the corners of the tank. Important! Disks must lie flat. They can be face up or down, but have to be flat. So make sure it can stay secured in a flat position before reburying or covering it back up.
Don’t place the disks more than 36 inches (or 900mm) above the top of the tank. That’s too far from the EBD Treatment Zone to work.
Can’t dig directly above the tank or don't know where it is? Use Method B.
Method B: Not Sure Where Your Tank Is?
If you can’t figure out where your tank is (and let’s face it, some of us may not have even realized we had one), then bury eight disks evenly spaced around the outside of where your tank probably is. (You'll Need 2 - Conventional 4 Packs for this)
Make a rectangle 18 feet by 7 feet (5.4 m x 2.1 m) over the assumed tank zone. Space your 8 disks evenly along that border, like tiny warriors forming a stink forcefield.